Wednesday, March 18, 2009

Cookware Giveaway

Food Service Warehouse Cookware

I was contacted by the PR people about this cookware giveaway. I thought I would let you all know in case you wanted to try and win some fancy new cookware. Just click the image to link over to the contest. Good Luck.

Tuesday, March 17, 2009

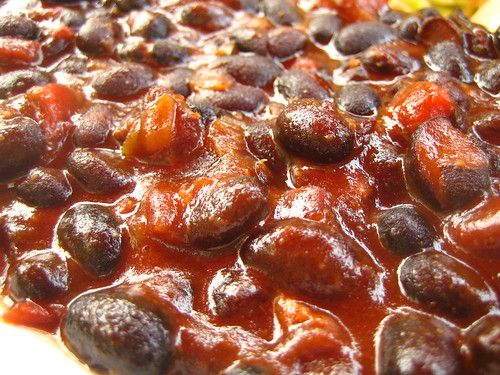
Baked Beans


I make these baked beans that I think are pretty good. I brought them to a wedding reception a while ago, BBQ themed, and a lot of other people seem too as well. They aren't as sweet as most of the store bought varieties. I'm always trying to duplicate the beans they make at this little BBQ and smokehouse place in Vancouver called Memphis Blues Barbecue House. The best. beans. ever! Oh, and the BBQ is good too.

Whenever someone asks me for the recipe I respond, "Oh, I just use the basic baked beans recipe from the More-With-Less Cookbook. And then I put in less molasses, use tomato sauce instead of ketchup, way more mustard and I add BBQ sauce and extra onions. And I use the crock pot." Then they look at me blankly and repeat their question, "Could I have the recipe?"

Apparently I didn't really give it to them after all. Well here it is. I shall try to record all of the changes that make it my recipe. You're welcome Barb.

Baked Beans

2 lb Navy Beans

4 qts water

Put in the crock pot and turn on low over night. *

In the morning drain, saving liquid.

Add 1/2 cup molasses

1 15/16 oz can of tomato sauce

1/2 cup prepared mustard

1 cup BBQ Sauce (without High fructose corn syrup of course)

1/2 cup red wine vinegar

5-6 dashes hot chili sauce

1 tbsp salt

1 tsp fresh ground pepper

1 large onion, chopped fine

1 tbsp minced garlic

2 bay leaves

Enough bean liquid to cover.

Stir together. Put lid back on crock pot and let cook on low for at least 4 hours.

Serve when ready.

Beans are very forgiving. If you taste it and think it ought to be sweeter, add more molasses. If you want it more tart, add more vinegar. Etc. You can adjust at the end if you need to. So tweak it until it's the way you like it. And then everyone will be asking you for your recipe.

* You can actually skip this step and cook it all together from the start in the crock pot, it just takes longer to finish then when starting with cooked beans. And you may want to soak them first.

**************
My friend Atara uses the basic recipe, she bakes it in the oven as intended. She puts a small ham in the middle and puts sauerkraut all over the top as it bakes. It tastes amazing. The ham is so tender when it's done. And the sauerkraut really compliments the flavor. I keep meaning to try this with my recipe to see how it turns out. At least the part with the ham.


photo by rick

Monday, January 19, 2009

Best Rice Side Dish Ever!!!

I invented this to go with a London Broil. I didn't have potatoes but I wanted something rich and flavorful to accompany the beef flavors. Here it is.

Ingredients

1 1/2 cups jasmine rice

2 scant cups water

1/4 cup butter

1 medium onion

3 cloves garlic, crushed

salt

pepper

Method
Soak rice for half an hour or so in cold water. (You don't have to do this but it really improves the texture if you do.) Rinse several times in cold water until the rinse water runs clear.

Combine rice and water in a saucepan, (or rice cooker). Over high heat bring to a boil. Immediately turn down to low and cover. Let steam until all water is absorbed and rice is translucent.

Dice onion fine. In a heavy bottom frying pan or sauce pan, melt butter and add the onions. Cook over medium high heat, stirring often, until the onions start to caramelize. You can tell that they are doing this when they start to turn a golden brown color and smell amazing. Throw in the garlic. Saute a minute longer. Add the cooked rice, stir until combined. Add salt and pepper to taste. And serve.

This also tastes good the next day with leftover meat cut in pieces and added in when it's reheated.

Saturday, November 29, 2008

Yam and Cranberry Spice Muffins

One of the reasons my posting has been so infrequent of late is that I've been mulling over the usefulness of what I write. See, I don't usually work from a recipe. I just throw stuff in a pot until it tastes right, and that's not the easiest thing to reproduce for other readers.

But, it's the way I cook. So if you're here I'm just assuming that's what you like to read.

Take today for example. I had a roasted and peeled yam in the fridge. I had half a bag of fresh cranberries left over. I decided to make muffins.

Now, muffins are not rocket science. They are hard to render completely inedible, regardless of what you add, as long as you stick to some basic rules.

You need flour, baking powder, eggs, oil, and liquid, the rest is just details. I used to start with a recipe, and then alter it to work with what I have on hand. That helped me to get an idea of proportions. Now, I usually wing it with what I know.

Today, I started with 1 1/2 cups of whole wheat flour, in a mixing bowl.

I washed the cranberries and put them in a saucepan with just enough water to cover them. I added a glop of sugar probably 2 TBSP and a bit of cinnamon and nutmeg. I let that boil just long enough for the berries to burst and then turned it off and set it aside.

I wanted a pretty dense grainy sort of breakfast muffin. So while the cranberries were boiling I added one cup of rolled oats and two handfuls of millet. (yes, I measure by the handful, it's very scientific.) Then I added 2 tsp of baking soda and 1/4 tsp of salt. (given how the muffins turned out I think next time I would add 1 tsp of baking soda, instead of the second tsp of baking powder. They were a bit more dense than I would like and the soda would hopefully fix that. Let me know :) Then I added a lot of ground ginger, cinnamon, and nutmeg. I several shakes, lets guess 1 tsp each. Or more if you want.

Then I mashed up the yam and added it to the flour mixture along with the cranberry sauce. Then I added two eggs. And then I added 1/4 cup molasses for sweetening, and 1 tbsp of oil.

It was still a bit too dry so I added 1/2 cup of yogurt as well, 1/4 cup at a time until it was right.

I baked them at 325 for about half an hour. And they were all gone less than a hour later.

This recipe made 1 dozen large muffins.

And that my friends is how to bake on the fly. If you've made muffins once or twice you know what the batter should look like. Just make sure you have:

  • a rising agent-Baking powder or soda, enough for the amount you have. My rule of thumb is one tsp per cup of flour or dried stuff, minimum.
  • A binding agent-the gluten in flour is binding to an extent, but with so much other stuff in it as well you need another binding agent, in this case, the eggs.
  • Oil-so the muffins aren't too dry. Again, because of the mashed yam in this I didn't need as much oil because the yam was moist enough.
  • Seasoning of some sort-salt, spices, vanilla extract, it depends on what else is in your muffin.
  • Sweetener-you can use sugar, honey, maple syrup, molasses, agave nectar, apple sauce, etc. You will adjust the amount of dry or wet ingredients depending on whether your sweetener is dry or wet. If it's dry, like sugar, you will need more liquid. If it's wet, you will need less of another type of liquid.
  • Some sort of liquid to get things to the right consistency. You could use water, if you want, but that's just boring. I like to use milk, blended fruit, yogurt, buttermilk (Really fluffy muffins with buttermilk) etc. Or you can add powdered milk to the dry ingredient and just add water for a cheaper alternative to milk.
And there you have all you need to try and use what you have in your kitchen already to make some muffins, transforming leftovers into something else entirely.

Good luck.

Tuesday, November 18, 2008

Get a big knife

photo from viZZZual.com


Here's a really simple frugal food tip.

If you cut everything smaller, it goes farther.

If you cut smaller pieces of meat before you cook it it will stretch farther than large pieces without anyone really feeling deprived.

I cut dried fruit smaller when I make muesli. The flavor is more evenly distributed that way and it takes less fruit for the same result.

There's even science behind this. Remember high school chem when they told you that if you increase the surface area you increase the intensity of the chemical reaction? Same applies in the kitchen. Needless to say, I use my big chef's knife and cutting board every day.

The smaller you chop your onions the more flavor you get out of them in a dish, same with garlic.

Raisins can be chopped up smaller before putting them in baking. You can turn 1/2 cup of raisins into close to one whole cup just by cutting them into smaller pieces.

So go forth and chop smaller.

And share your frugal tips in the comments.

Thursday, July 31, 2008

Greek Style Yogurt and Flavored Yogurt from Homemade-And Homemade Yogurt Cheese All in One Post!

First let's talk about Greek Style yogurt. What is it exactly?

It' s a high fat content yogurt that is really creamy. Thankfully, making it is one of the simplest things ever. This is also how to thicken your yogurt that was a bit too runny.

Ingredients-
Plain yogurt made from whole milk.

Method.

Line a plastic colander with a clean cheese cloth. Place inside a large bowl. Pour the yogurt into the cheesecloth line colander. Pull all of the loose ends together and tie in a loose knot on the top, or use a clip or twist tie. If you can't close it up remove some of the yogurt and try again.

Put it in the fridge for a few hours. As it sits in the cheese cloth the whey, or liquid, will start to drain and the fat will remain in the cheese cloth. In a few hours you will have thicker creamier yogurt exactly like Greek style yogurt. If you leave it for a few days you will have yogurt cheese.

Do not discard the whey. Save it and use it as a substitute for buttermilk in any recipes you may have. You can also use it to start more yogurt.

The traditional way to sweeten Greek style yogurt is with honey which you can drizzle on top when serving, or stir in before hand. You can also add any other flavors you enjoy. Jam is a good way to add flavor to yogurt, or stir in fresh pureed fruit. And, you can freeze it and then you have it as frozen yogurt. What could be easier?

To flavor yogurt cheese. Add a bit of salt to taste and use as cream cheese or in dips. It tastes especially good with that Hungarian eggplant dip. What's it called...arghh! like Baba Ganoush but not. If you know what I'm talking about let me know?

I also like to chop up and add fresh herbs to it, like rosemary and basil and dill, with some fresh ground pepper, it tastes great on crackers and bagels, and as a dip for veggies, or plain on a pita with some hummus and olives. You'll find lots of ways to use it.

Now if you are really ambitious and want to try making fruit on the bottom yogurt like you buy it in the stores instead of stirring in flavor afterwards here is how.

You need to start with the fruit preserves. You can make this yourself by simmering fruit over a hot stove until it is a thick sauce, adding sugar or honey helps to thicken it. Or you can use a fruit preserve that is already made. Your own, or something you bought at the store.

Follow the instructions in Making Yogurt-How to make yogurt at Home.
When you get the containers ready for the warm milk, carefully pour some of the fruit preserve into the bottom of the containers. Try not to get it on the sides of the container. How much will depend on the container size, and how much flavor you like to add to your yogurt. I would say 1/2 to 1 inch high at the bottom of a quart jar. When your milk is ready to pour into the containers, slowly and carefully on top of the preserves. Be careful not to pour too quickly and stir the milk and fruit together. Place the caps on the jars, and carefully, so as not to disturb the layers, put it in your warm place and wait until it sets. Then pull it out and impress all of your friends with your stellar homemaking skillz. It looks pretty actually, and makes a good gift basket item. But it's just as easy I think to stir jam or preserves into plain yogurt just before you eat it.

Monday, June 30, 2008

What to do to "rescue" yogurt that doesn't turn out.

Sometimes yogurt doesn't turn out.

You reach into the warm oven in the morning and instead of firm tangy yogurt you have warm milk. Oops. It happens to everyone once in a while.

Before you throw away all that milk, here are a few things to try to fix it.

The problem is always either temperature or culture.

If your culture is/was dead, nothing you can do will make your milk turn into yogurt. You need to get a new starter and begin again.

Usually though the problem is one of temperature and is easy to fix. If your yogurt didn't turn out, you either put the culture in when it was too hot and killed it, which isn't likely if you were using a thermometer carefully, or, that it cooled off too fast before the yogurt could thicken.

The latter is almost always the case, and is relatively simple to fix.

Put your yogurt back into a pot with a thermometer. Stand over it like a hawk and make sure to remove it from heat the instant the thermometer reads 110-115F. Any warmer an you will kill your culture. (If you have more that's not a problem, but if you are like me and use the last of your former batch to start the next one, you probably don't any more culture handy.)

Pour the warm again milk back into the storage containers and put it back in the warm oven. If you have a digital temperature control and can set the oven to 110F do so and leave it on. Check on the yogurt in 4 hours.

If you have an older oven, set it to the lowest possible setting, just when the light comes on, and turn it off once the light goes off. In two hours check the inside of the oven to see how warm it is. If it's starting to feel cool, turn it back on again for a few minutes to warm back up. Be sure to turn it off after a few minutes. You don't want to kill the culture or cook the yogurt.

Most times this will do the trick and closer attention to temperature will help your yogurt work the second time around. If it doesn't work get a new starter and use this batch as buttermilk in recipes. I wouldn't try it a third time.

If you find that your oven just doesn't stay warm enough long enough here are a few alternate ways to incubate yogurt.

Alternate Methods of Incubation for Yogurt
Related Posts with Thumbnails